RabbitMQ as we all know has been around for long and is being used in more than 40% applications worldwide for Message Queuing which implements Advanced Message Queuing Protocol (AMQP). Based on Erlang Programming Language it handles clustering and failover very smoothly.
RabbitMQ is used to queue messages sent between applications. For example, I could queue some messages in RabbitMQ from one part of the application and put some workers for another application below it which would process those messages as an when required and get the task done. You can read more about RabbitMQ.
![]()
Use Case
Setting up RabbitMQ cluster and configuring failover. Clustering is inbuilt into RabbitMQ and for failover we will use AWS Route 53 and AWS CloudWatch. I am assuming you already have a RabbitMQ server setup on an AWS EC2 instance or any other platform. We will be creating a new RabbitMQ node and then creating a cluster. At Haptik, we believe in more reliable architectural components and hence we decided to implement this. This is not Load-Balancing.
Pre-requisites
- 1. RabbitMQ server up and running. You can follow this if you don’t already have that:
Setup RabbitMQ.
2. A new node/server could be an AWS EC2, Digital Ocean droplet or any other platform.
3. Follow the steps in the above link to install RabbitMQ server on the new node as well. Remember that versions should be same on this serve and RabbitMQ Management plugin should also be enabled for UI. It can be enabled following the steps. You can check it running on port 15672. You can also just bring up the new server using an AMI of the master server.
Steps To Follow To Setup The Cluster
Steps on the RabbitMQ server 1:
1. SSH into your RabbitMQ server 1. Let’s call it rabbitmqnode1.
2. Set hostname using following commands.
hostname rabbitmqnode1 |
Edit the following file /etc/hosts and make the following entry there:
127.0.0.1 rabbitmqnode1"Public/Private IP of your new RabbitMQ server" rabbitmqnode2 |
3. You’ve now set a hostname for your RabbitMQ server and told it which is the other node in the cluster you’re about to setup.
View the content in the Erlang cookie file which can be found at /var/lib/rabbitmq/ using
It should show content as follows:

- Just copy the text and keep it handy.
Steps on the RabbitMQ server 2 (New Server):
1. Stop RabbitMQ server app using the command:
sudo rabbitmqctl stop_app |
2. Now, go ahead and replace the erlang cookie on this server. Remember the erlang cookie we previously copied from server 1?
3. Now, run the following commands one by one:
sudo rabbitmqctl reset rabbitmq-plugins enable rabbitmq_management sudo rabbitmqctl join_cluster rabbit@rabbitmqnode1sudo rabbitmqctl start_app |
(Adds this server as a part of a cluster of rabbit1 (the primary rabbitmq server))
| rabbitmqctl join_cluster --ram rabbit@rabbitmqnode1 |
(This does the same but adds it as a RAM node, meaning everything will be save over RAM and non-persistent as in Disk mode which is default)
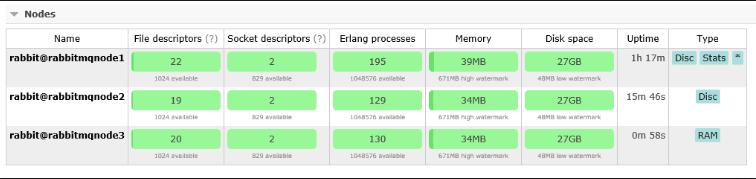
4. Run the following commands to set HA policy and see the cluster status now and you should see all the nodes in the cluster and their mode, whether RAM or DISK:
sudo rabbitmqctl set_policy -p <strong>your-</strong><strong>virtual-host-name</strong> ha-all ".*" '{"ha-mode":"all","ha-sync-mode":"automatic"}'rabbitmqctl cluster_status |
You’re done. In the management console of all the nodes on the browser, you will see same graphs, messages, queues. This is an active-active cluster that we have setup. Below is an example of how the nodes would look like (I have added a third one as well which is in RAM mode):
Steps To Setup Failover
For failover, I am using a simple AWS Route53 Health check, which makes a DNS switch to one of the secondary servers if the primary server fails to respond. Once the above steps are performed, you can just make a simple script to push RabbitMQ master’s status to AWS CloudWatch. There can be infinite ways to do so, I am using a simple telnet:
#!/bin/bashINST_ID=i-0584axxxxxxxxxxxcd /usr/local/nagios/etc/objects/scriptsrm -rf /usr/local/nagios/etc/objects/scripts/myoutputfiletelnet rabbit.xxxxxxxstagingtestwebsite.com 5672 | tee -a /usr/local/nagios/etc/objects/scripts/myoutputfilecat /usr/local/nagios/etc/objects/scripts/myoutputfile | grep "Connected"if [ $? -eq 0 ]; thencount=1/usr/local/bin/aws cloudwatch put-metric-data --metric-name "RabbitMQ staging UP/DOWN" --unit Count --value $count --dimensions InstanceId=$INST_ID --namespace Rabbitmqelsecount=0fi |
So, if the it’s connected, I push count 1 to CloudWatch else I push 0 which means the host is down.
Just make a relevant AWS CloudWatch alarm which is at alarm state when the count is 0. We will use the same alarm in AWS Route 53 health check.
Just go to AWS Route 53 and setup a health check from the menu from the left hand side:
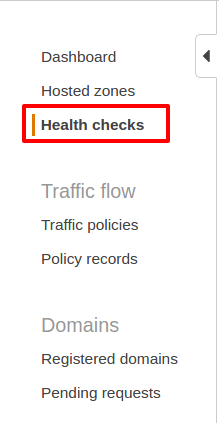
Now, select Create health check:

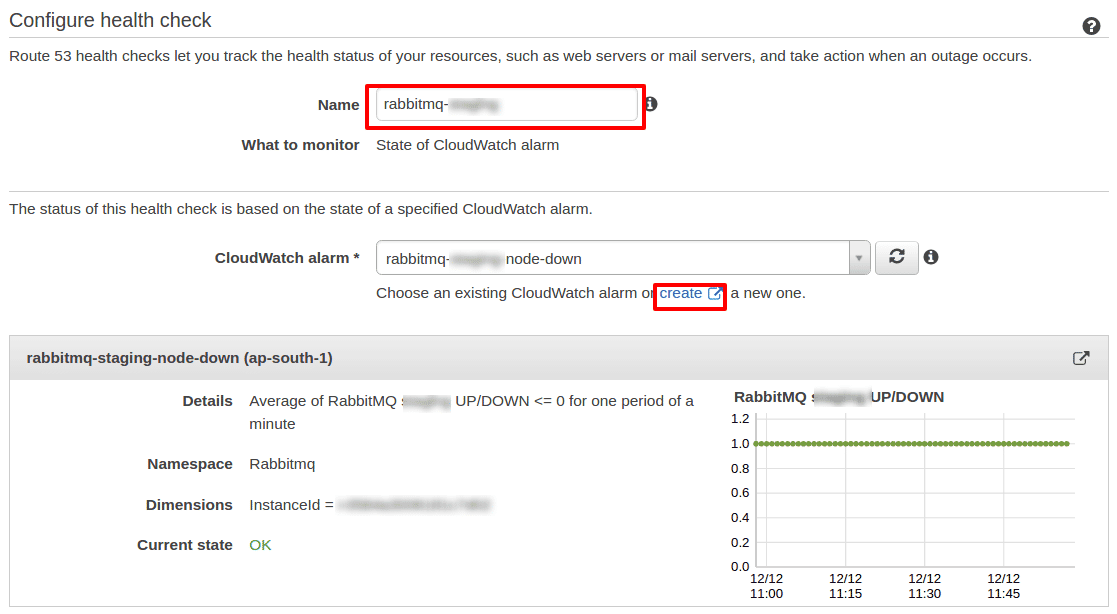
The above shall open a page where you need to enter some details. I will keep it brief here. I have chosen based on State of CloudWatch alarm because I have used the above script to note the status of my RabbitMQ server:
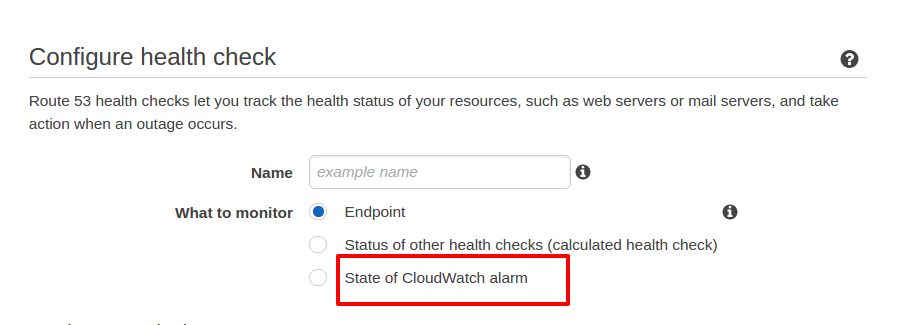
If I choose an endpoint, it should be publicly accessible, which is not true in my case. My RabbitMQ server is not publicly accessible. Now, choosing that gives me options as below:

Once you’re done with that, you can click on Next and that should create the health check for you. Now, you can see the health check status as follows:
Once the above is done, i.e. the health check is configured, just create a DNS failover in AWS Route53 based on the health check we just made.
(Assuming you know how to do that, else you can follow the steps here: Route 53 DNS Failover)
Hope this helps you setup a working RabbitMQ cluster. I will soon be coming up with more exciting blogs. Until then keep following Haptik Tech Blog.