
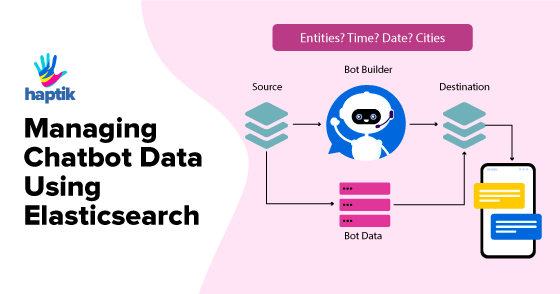
A good chatbot requires a lot of structured data, in order for it to carry out an enjoyable conversation with users. Entering this data, however, is not the most delightful task in the world. Being one of the world’s largest conversational AI platforms, we have built tools that help make this task not just easy, but also fun!
Our chatbot platform has many tools such as a bot builder, analytics dashboard, admin portals and a desktop chat tool for humans to take over.
We use a ReactJS based bot-builder tool which is one of our offerings on the Haptik platform. This tool updates various databases such as MySql, MongoDB, Elastic search and Redis which the chatbot uses in real-time. This is what it looks like:

Chatbot development process takes place in our staging/UAT environment. This is where we use the bot builder tool to build the bot from scratch or a predefined bot template. While building the bot we add all the chatbot specific data and train the bot which pushes data into various data stores. Within this environment, one can test the bot (can be seen on the left bottom corner of the above screenshot) and know if it is working as expected.
Next step is to move this bot to production. Re-creating the bot again in the production environment with all the data would be a nightmare. So, for this, we built a feature using which one can transfer an entire chatbot from staging to the production environment.
During the above transfer process, Elasticsearch was the most time-consuming of the lot, it literally accounted for 80% of all the data that needed to be moved, mainly because that bit of logic was always shared across all our deployed chatbots.
The Elasticsearch transfer alone took 15 mins. This was acceptable when there were bots transferred once on a weekly basis, but we soon found ourselves in a situation where we were shipping 10 Chatbots on a daily basis.
We clearly had work to do, so let’s go ahead and understand the problem in detail, and how we fixed it using a beautiful concept called aliases in Elasticsearch.
What the System looked like earlier
This was our legacy system, built once during our initial stages and not upgraded for over a year.
The diagram below depicts the older process of managing Elasticsearch data:

When our bot builder tool requests to transfer a bot, it also means it’s time to transfer all the Elasticsearch data to our production environment.
Here is a simplified algorithm we used to do the same: (refer to the above diagram)
- 1. We copy the current state of the data in staging live index to prod temp index
- 2. We take a backup of the prod live index to prod backup index
- 3. Delete prod live index
- 4. All endpoints now rely on CloudFront caching:
What allowed us to delete prod live index on Elasticsearch was AWS CloudFront CDN caching. We cache responses for various URLs and during that time the request would directly be served via CF without touching our backend application.- 5. Copy prod temp index into new created prod live index
- 6. Prod live index now has the latest data
We mainly used elasticdump to perform most of the above actions, we also make sure that we copy the settings and mappings of the source index. Take a look at the code snippet:
elasticdump --input=https://elastic_search_host:port/index_name --output=https://elastic_search_host:port/index_name --type=analyzer elasticdump --input=https://elastic_search_host:port/index_name --output=https://elastic_search_host:port/index_name --type=mapping elasticdump --input=https://elastic_search_host:port/index_name --output=https://elastic_search_host:port/index_name --type=data |
For more information, please refer elasticdump.
The above process took at least 10-15 minutes, mainly because of the multiple copies and backups of a huge data set.
Clear Problem Areas as Identified:
- 1. Data was stored in a very monolithic manner.
- 2. Unnecessary temp index was present on our production Elasticsearch environment.
- 3. Transferring all data for a single bot took 10-15 mins.
- 4. Transferring Multiple Bots simultaneously was not a possibility.
- 5. Elasticsearch Indices setup in production and staging environments were not the same as on prod we had three indices (temp, backup and live), and on staging, we only had one which was treated as the live index.
Potential Solutions
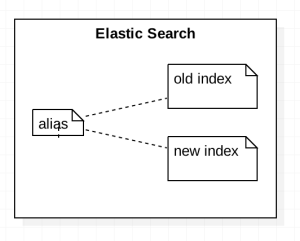
Elasticsearch Aliases
As the system matured with us, we reached a point where at least 10 bots were being transferred a day, we now needed to upgrade the expensive Elasticsearch data transfer process into a seamless 10-20 seconds activity.
Elasticsearch Aliases as the name suggests allows us to create a pointer of sorts, that will behave like an index when queried for, and we can point it internally to multiple indices, quickly and seamlessly.
We could definitely use this since changing the index to which an alias points to is inexpensive. Thereby, we could also reduce the total amount of data being transferred and the concept had a lot of potential.
To add and remove indexes for an alias, a simple query like the one below would create the alias if it does not exist, moreover, it would remove index_one if it was pointing to it, and add index_two, again if it was not already pointing to it.
POST /_aliases{ "actions" : [ { "remove" : { "index" : "index_one", "alias" : "alias_name" } }, { "add" : { "index" : "index_two", "alias" : "alias_name" } } ]} |
For complete information on what an alias is please refer Aliases API.
-
Analyzing our data
We then ran some analysis on our Elasticsearch data. Our aim was to figure out which part of our dataset changed frequently, rarely, or never. Once we were equipped with this information, we were able to use aliases to our advantage.
Here is what we found:
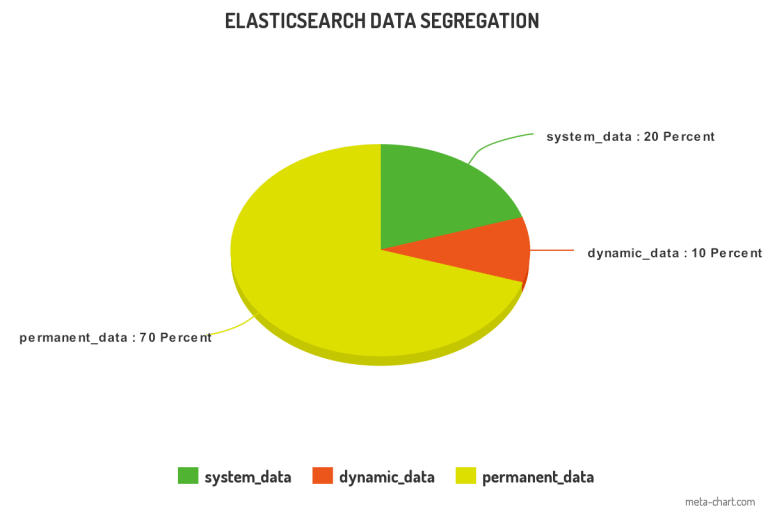
- 1. We found that around 70% of our data was not changing at all.
- 2. 20% of our data rarely changed, like once a month.
- 3. 10% data was extremely dynamic in nature.
4. We started off with a simple setup script that we could run across all environments.
First, the setup script would segregate the environment’s live index into 3 small indices, and also create an alias, which would point to 3 smaller, newly-created indices. Our permanent data and rarely changing data would now be separate from our dynamic data. Thus, our systems would be ready for an improved transfer process.
The basic algorithm for architecture setup:
1. Pull out 80% of the static data that does not change
2. Create an index say permanent_data and dump 70% permanent data there
3. Create another index say dynamic_data and dump 10% there
4. Create the last index for rarely changing system_data and dump 20% there
5. Create an alias that points to permanent_data, system_data and dynamic_data
6. Delete & remove the dependency from the prod index
7. Finally, rename alias to prod index name
From an endpoint perspective, there were no changes required, so all underlying systems continued to work as expected.
Let's put it all together now!
Our permanent chatbot training data which accounts for 70% of the data is maintained in one separate index.
System chatbot data (20%) which changes like once a month on average is maintained on a separate index.
Dynamic chatbot data (10%) in its own dedicated index, two copies will have to be maintained, let’s say version_1 and version_2
Also, note that the current setup is consistent across dev, staging and prod owing to our setup script.
To understand this, let’s consider the scenario that currently Staging alias points to version 1 and Prod alias points to version 2:
- 1. When the transfer button is hit on staging, the data to be transferred is pulled from staging version 1 (as that is the current live index of sorts in our staging environment).
- 3. ES settings and mappings of staging version 1 are copied as settings in prod version 1
- 5. Delete and update query (as generated in step 1) is now inserted into prod version 2.
- 6. Change Alias to point to prod version 2, and remove version1.
- 7. Version 1 is now logically considered the backup.
Note: When copying settings and mappings across two different environments it is essential to first create a blank index on the destination environment, with the new mappings and settings and then copy the data into the destination index.
The code snippet below shows how we copy source index’s settings, mappings and eventually the data into the destination index:
# when we simply request for an index, without any query we receive its mapping and setting information.index_to_backup_url_response = requests.get(index_to_backup_url)source_index = json.loads(index_to_backup_url_response.content)[index_to_backup] # fields that we do not want to copy, so popping them out of the dictionarysource_index["settings"]["index"].pop("creation_date", None)source_index["settings"]["index"].pop("uuid", None)source_index["settings"]["index"].pop("provided_name", None)source_index["settings"]["index"].pop("version", None)source_index.pop("aliases", None) # deleting the backup_index and creating and empty backup index with new mappings and settings. requests.delete(backup_index)requests.put(backup_index_url, json=source_index) # es query that will copy data from one index to another# size indicates in how many chunks the data should be copied.final_request_dict = { "source": { "index": index_to_backup, "size": 10000 }, "dest": { "index": backup_index }}reindex_response = requests.post('{es_url}/_reindex'.format(**{'es_url': es_url}), json=final_request_dict) |
To understand what we mean by indices, mapping and setting, please refer here.
Another part of our code that will delete and update specific records on an index, we used Elasticsearch helpers for this.
Note: Elasticsearch helpers is an open source python library maintained officially by Elasticsearch itself. It is a collection of simple helper functions that abstract some specifics of the raw API, we specifically used it for its bulk update functionality.
from elasticsearch import Elasticsearch, RequestsHttpConnectionfrom elasticsearch import helpers # updated_records contains individual records with destination index informationes_destination_connection = Elasticsearch(hosts=[{'host': ip, 'port': int(port)}]) helpers.bulk(es_destination_connection, updated_records, stats_only=True) |
For more information on Elasticsearch helpers, refer here.
The below diagram represents what the Elasticsearch indices architecture looks like after the systems were updated along with its underlying code.

Yes, now all our environments are in sync, all our data moves seamlessly and we are capable of deploying several bots on a daily basis.
Conclusion
The amount of data being transferred across environments has been reduced by 70%
We have also managed to reduce the total amount of data that needs to be eventually stored and maintained on our Elasticsearch servers across all three environments.
- No more Temp index or Backup Index
- Backup of only the 10% dynamic bot specific data
We now transfer chatbot specific data in under 15-20 seconds as compared to the earlier 15 minutes.
Now that’s an optimization task done right.


.webp?width=352&name=Charles-Proxy%20(1).webp)


source on Google