Machine Learning has proven to be a great advantage over the simple rule-based system. However, it comes with its own set of complexities such as training model, its size, computation, etc. As a result, it becomes challenging to use machine learning for mobile applications, where users expect a quick response.
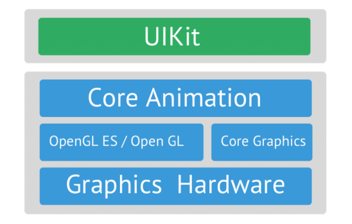
But with the release of TensorFlow lite by google, it’s now possible to ship and run any deep learning model directly on the device using Firebase MLKit.
Before delving deeper into this, let’s first understand the key advantages of having an ML model on the device:
- No server communication and hence reduced hosting cost
- Offline support – Will work without Internet
- Speed – Speed of the task will improve as all processes are running locally
- Privacy – Data will reside inside the user’s device

We will be using python as the backend to train and convert a model to the Tflite type. Below is an overview of the topics we shall be covering:
- 1. Data preparation and preprocessing
- 2. Building word tokenizer
- 3. Building a text classifier model using bag-of-words as Feature using Keras.
- 4. Converting Keras model (.h5) to Tflite format.
- 5. Creating an android application to run inference on the offline model.
Data Preparation
We need to first create a dataset for text classification. For simplicity, we can use SNIPS intent classification dataset with classes.
You can download the dataset.
import csvsentences , labels = [], []with open('data.csv','r')as f:data = csv.reader(f)for row in data:sentences.append(row[0])labels.append(row[1]) |
Building Word Tokenizer
Since Machine Learning works only on numbers, we need to first transform sentences to fixed number representation. For this, we will create a word_index dictionary, with a mapping of each word to a unique identity number.
Here we will read uniques words from a sentence list and assign them a unique index. This will then be used to convert sentences to list of numbers:
sentences = [re.sub(r'.,:?{}', ' ', sentence) for sentence in sentences]corpus = " ".join(sentences)words = set(doc.split())word_index = {word: index for index, word in enumerate(words)}with open( 'word_index.json' , 'w' ) as file:json.dump( word_index , file ) |
Building a Text Classifier model
We will build a text classifier (using the bag-of-words feature) using DNN architecture and bag-of-words as input feature:
from sklearn.preprocessing import LabelEncoderimport tensorflow as tffrom keras.layers import Dense, Input, Dropoutfrom tensorflow.python.keras import models, optimizers, losses, activationsfrom keras.layers.normalization import BatchNormalizationfrom keras.callbacks import EarlyStopping, ModelCheckpointfrom sklearn.model_selection import train_test_split LE = LabelEncoder()def train_and_eval(sentences, label): # converting categorical label labels = LE.fit_transform(labels) labels = np.array( labels ) num_classes = len(labels) onehot_labels = tf.keras.utils.to_categorical(labels , num_classes=num_classes) setences_tokens = [sentence.split() for sentence in sentences] tokenizer = tf.keras.preprocessing.text.Tokenizer() tokenizer.word_index = word_index sentences_features = tokenizer.texts_to_matrix(setences_tokens) train_features, val_features, train_labels, val_labels = train_test_split(sentences_features, onehot_labels, test_size = 0.1) feature_input = Input(shape=(sentences_features.shape[1],)) dense = Dense(128, activation=activations.relu) merged = BatchNormalization()(dense) merged = Dropout(0.2)(merged) merged = Dense(64, activation=activations.relu)(merged) merged = BatchNormalization()(merged) merged = Dropout(0.2)(merged) preds = Dense(num_classes, activation=activations.softmax)(merged) model = Model(inputs=[word_input], outputs=preds) model.compile(loss=losses.categorical_crossentropy, optimizer='nadam', metrics=['acc']) early_stopping = EarlyStopping(monitor='val_loss', patience=5) model.fit([train_features], train_labels, validation_data=([val_features], val_labels), epochs=200, batch_size=8, shuffle=True, callbacks=[early_stopping]) model.save('models.h5') |
Run the method given below to test your model by giving a model path and word_index path:
def test(sentence, model_path, word_index_path)classifier = models.load_model( 'models/models.h5' )tokenizer = tf.keras.preprocessing.text.Tokenizer(filters='.,:?{} ')sentences = re.sub(r'.,:?{}', ' ', sentence)with open(word_index_path, 'r') as f:tokenizer.word_index = json.loads(f.read())tokenized_messages = tokenizer.texts_to_matrix(sentence.split())p = list(classifier.predict(tokenized_messages)[0])for index, each in enumerate(p):print(index, each) |
Converting Keras Model (.h5) to Tflite format
We need to convert the above model file to Tflite format, which we will then ship to the ML kit and android device.
def convert_model_to_tflite(keras_model_path): tf.logging.set_verbosity( tf.logging.ERROR ) converter = tf.contrib.lite.TFLiteConverter.from_keras_model_file( keras_model_path ) converter.post_training_quantize = True tflite_buffer = converter.convert() open( 'model.tflite' , 'wb' ).write( tflite_buffer ) print( 'TFLite model created.') |
Creating the Device Application
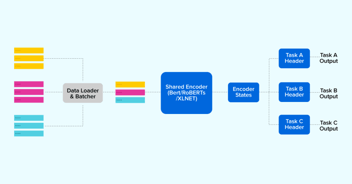
Given below is the basic flow of how the ML model works on the device.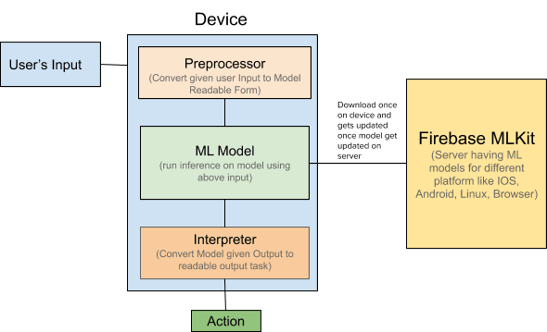
Let’s now discuss step-by-step the process we will be following to run inference.
Starting your project
- 1. Add word_index.json and model.tflite inside assets of your android project.
- 2. Add the dependencies for the ML Kit Android libraries to your module (app-level) Gradle file (usually app/build.gradle):
dependencies {// ...implementation 'com.google.firebase:firebase-ml-model-interpreter:21.0.0'}apply plugin: 'com.google.gms.google-services'
Also, in your build.gradle ( app-level ), add these lines, which will disallow the compression of .tflite files.
android { ... } buildTypes { release { ... } } aaptOptions { noCompress "tflite" }} |
Hosting Models on Firebase

Follow the below steps to host your model.tflite mile to MLKit console.
- 1. In the ML Kit section of the Firebase console, click the Custom tab.
- 2. Click Add custom model (or Add another model).
- 3. Specify a name that will be used to identify your model in your Firebase project, then upload the TensorFlow Lite model file (usually ending in .tflite or .lite).
- 4. In your app’s manifest, declare that INTERNET permission is required:
<uses-permission android:name="android.permission.INTERNET" />
Define Constants value used for Model
// model name given to custom model stored on MLKitpublic static String REMOTE_MODEL_NAME = "mlmodel"; // model name given to model stored locally (can be the same as on MLkit)public static String LOCAL_MODEL_NAME = "mlmodel";// file for word dict with word to index mappublic static String WORD_DICT_FILE = "word_index.json";// file for model stored locally inside assetspublic static String LOCAL_MODEL_FILE = "model.tflite";// input shape to your model (max value of index in word_index.json file)public static Integer MODEL_INPUT_SHAPE = 30;// number of classes for your text classification task public static Integer MODEL_NUM_CLASS = 8; |
Creating Model Input for Given Text
This method will return a list of integers in the required shape expected by the model. Here are the steps involved:
- 1. Read word_index file from assets.
- 2. Clean the text, removing punctuations, extra spaces, etc.
- 3. Create a list of zeros of the size of the model input shape.
- 4. Split text into words, based on words present in the text, it finds the index of that word from word_index and assigns value 1 that index in the list of the above-created zeros.
Code for the above implementation is given below:
public static String cleanText(String text){ String clean_text = text.toLowerCase(); clean_text = clean_text.replaceAll("[.,:?{}]+", " "); clean_text = clean_text.trim(); return clean_text;}private float[][] textToInputArray(String text) throws JSONException { float[][] input = new float[1][MODEL_INPUT_SHAPE]; JSONObject word_dict = new JSONObject(readJSONFromAsset(WORD_DICT_FILE)); String clean_text = cleanText(text); String[] words = clean_text.split(" "); for (String word : words) { if (word_dict.has(word)) { int index = word_dict.getInt(word); input[0][index] = 1; } } return input;} |
Run Classification
Call run inferencemethod with the above-processed model input. It returns the label (int) with the maximum confidence score.
public class MLModel { float[] probabilities = new float[Constant.MODEL_NUM_CLASS];public void configureHostedModelSource() { // [START mlkit_cloud_model_source] FirebaseModelDownloadConditions.Builder conditionsBuilder = new FirebaseModelDownloadConditions.Builder().requireWifi(); if (Build.VERSION.SDK_INT >= Build.VERSION_CODES.N) { // Enable advanced conditions on Android Nougat and newer. conditionsBuilder = conditionsBuilder .requireCharging() .requireDeviceIdle(); } FirebaseModelDownloadConditions conditions = conditionsBuilder.build(); // Build a remote model source object by specifying the name you assigned the model // when you uploaded it in the Firebase console. FirebaseRemoteModel cloudSource = new FirebaseRemoteModel.Builder(Constant.REMOTE_MODEL_NAME) .enableModelUpdates(true) .setInitialDownloadConditions(conditions) .setUpdatesDownloadConditions(conditions) .build(); FirebaseModelManager.getInstance().registerRemoteModel(cloudSource); // [END mlkit_cloud_model_source] } public void configureLocalModelSource() { // [START mlkit_local_model_source] FirebaseLocalModel localSource = new FirebaseLocalModel.Builder(Constant.LOCAL_MODEL_NAME) // Assign a name to this model .setAssetFilePath(Constant.LOCAL_MODEL_FILE) .build(); FirebaseModelManager.getInstance().registerLocalModel(localSource); // [END mlkit_local_model_source] } private FirebaseModelInterpreter createInterpreter() throws FirebaseMLException { // [START mlkit_create_interpreter] FirebaseModelOptions options = new FirebaseModelOptions.Builder() .setRemoteModelName(REMOTE_MODEL_NAME) .setLocalModelName(LOCAL_MODEL_NAME) .build(); FirebaseModelInterpreter firebaseInterpreter = FirebaseModelInterpreter.getInstance(options); // [END mlkit_create_interpreter] return firebaseInterpreter; } private FirebaseModelInputOutputOptions createInputOutputOptions() throws FirebaseMLException { // [START mlkit_create_io_options] FirebaseModelInputOutputOptions inputOutputOptions = new FirebaseModelInputOutputOptions.Builder() .setInputFormat(0, FirebaseModelDataType.FLOAT32, new int[]{1, MODEL_INPUT_SHAPE}) .setOutputFormat(0, FirebaseModelDataType.FLOAT32, new int[]{1, MODEL_NUM_CLASS}) .build(); // [END mlkit_create_io_options] return inputOutputOptions; } public float[] runInference(float[][] input) throws FirebaseMLException { FirebaseModelInterpreter firebaseInterpreter = createInterpreter(); FirebaseModelInputOutputOptions inputOutputOptions = createInputOutputOptions(); // [START mlkit_run_inference] FirebaseModelInputs inputs = new FirebaseModelInputs.Builder() .add(input) // add() as many input arrays as your model requires .build(); firebaseInterpreter.run(inputs, inputOutputOptions) .addOnSuccessListener( new OnSuccessListener<FirebaseModelOutputs>() { @Override public void onSuccess(FirebaseModelOutputs result) { // [START_EXCLUDE] // [START mlkit_read_result] float[][] output = result.getOutput(0); for (int i = 0; i < MODEL_NUM_CLASS; i++) { probabilities[i] = output[0][i]; }// probabilities = output[0]; callback.onSuccess(probabilities); Log.d("Success prediction", "" + probabilities[7]); // [END mlkit_read_result] // [END_EXCLUDE] } }) .addOnFailureListener( new OnFailureListener() { @Override public void onFailure(@NonNull Exception e) { Log.d("Error prediction", e.toString()); callback.onFailure(e.toString()); // Task failed with an exception // ... } }); return probabilities; // [END mlkit_run_inference] }} |
I hope the above helps you in getting started with ML on-device. Please do try the above and let us know if you have any feedback. We will be sharing more details in the following blog.
Haptik is hiring. Do visit our careers page.