Finite State Machines To The Rescue!

Building chatbots at Haptik is our Forte & we try to follow the best practices available out there to solve complex problems in hand. Recently, we were facing a problem where our conversation flows have become very complex over a period of time and the code that is written was getting hard to manage and understand.
When we started digging deeper we noticed that most of our flows follow a simple state machine where based on a decision of the previous steps the next step is decided.
So What Is A Finite State Machine?
“A finite state machine (FSM) or finite state automaton (FSA, plural: automata), finite automaton, or simply a state machine, is a mathematical model of computation. It is an abstract machine that can be in exactly one of a finite number of states at any given time”.
–Wikipedia
Finite state machines come handy for state management. This design pattern is quite common with programmers in the gaming world. You can represent your data in a variety of state machines. You need to choose the one that best fits the use-case in hand. This programming pattern forces you to expose your data and think about different scenarios and evolutions thereby making your code concise and readable. Anyhow, this is “not a one-size fit all approach“.
How Do We Use Finite State Machines At Haptik?
Let’s take a simple problem and define its scope first. At Haptik, we have a feature where a user can set a reminder for their daily tasks and we call them to remind them about it. In this flow, one of the major requirements is that a user should be able to update a reminder that they have set previously. For example: If a user has set a reminder for 25th September at 7:00 am they should be able to change the date and time of the reminder at any given point in time.
What Does It Take To Update A Reminder Flow?
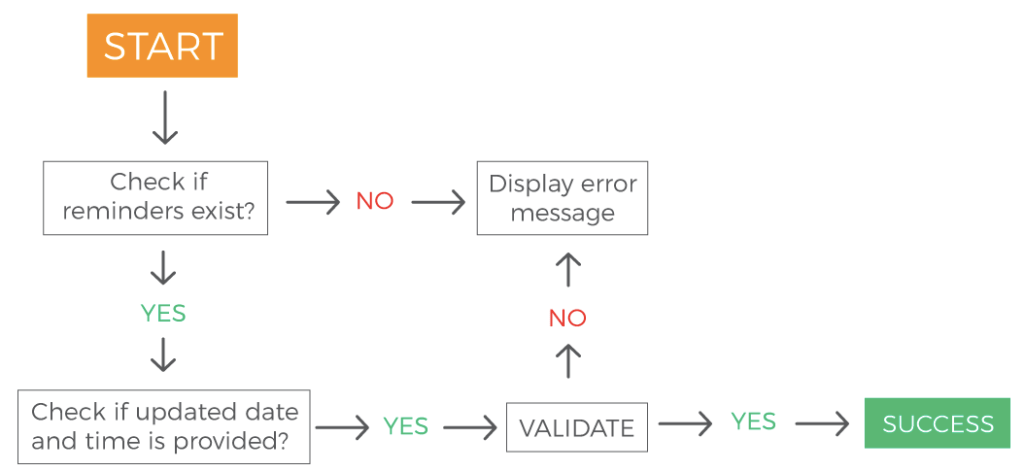
- 1. User comes to the app and says I want to update my reminder
- 2. Then we check whether the reminder exists or not
- 3. If it exists, we check if updated date & time is provided
- 4. If we have the updated date & time, we check if it is valid or not
- 5. If it is valid, we go ahead and update the reminder
The above is a basic happy flow but if you look at the flow diagram there are a lot of negative cases that we need to handle as well. That’s where things start getting complex and if the code is not written well, it becomes hard to understand.
First, you start to think about different entities/states for the given use case; these become the states of your finite machine. Next, you start to think about transitions/events that can be triggered which allows you to move from one state to the other.
Implementation Without Using State Machines
Let’s try to implement the above use-case without using state machines. First of all, we would start modeling our data and then we would start to think about the functionality. Later, we would need to map each functionality to a function which deals with a single responsibility pretty well:
class Reminder:...model data ...def welcome_message(self):print('Hi! Will help you to update reminder')\start_update()def start_update(self):...check_reminder_exist()...def check_reminder_exist():# make db call and check if an upcoming reminder existsif exists:validate()else:display_error_message()... |
You can see where this is going. One has no idea about the current state and has to deal with various conditions. This gets messier as the code base becomes larger. For someone having a look at the code for the first time, it would be a nightmare. Also, when any new change has to be made, the code has to be touched at multiple places and the possibilities of missing out edge cases and making mistakes is very likely.
Implementation Using State Machines
Now, let’s get our hands dirty and learn how simple it is to create a finite machine to solve the above problem. A great module called state_machine is available as a pip package. It’s a simple well-written Python Framework to create customizable finite state machines (FSMs). You can read more about state machines.
Installation:
pip3 install state_machine |
Let’s start with the Reminder class. Each update will have its own state machine. The first step to create a state machine using the state_machine module using the @acts_as_state_machine decorator:
@acts_as_state_machineclass Reminder: # definition goes here |
Next, we define the states of our FSM (Finite State Machine). We need to mention the initial state of the machine; we can do that by passing initial=True in the constructor call of State:
# Below code goes inside the reminder class # An internal state which starts the update process for the reminder:start = State(initial=True)# An internal state to check if reminder existsreminder_exists = State()# An internal state to check is the updated data and time is provided by the userupdated_data_exits = State()# An external state which displays error message to userdisplay_error = State()# An internal state which checks the validity of modification:validate = State()# An external state which marks successful update:success = State() |
We continue defining the transitions. It is normal to execute one or more actions before or after a transition occurs. In the state_machine module, a transition has the name Event. We define the possible transitions using the arguments from_states (can be either a single state or a group of states) and to_state like in the below example:
start_update = Event(from_states=start, to_state=reminder_exists)display_error_message = Event(from_states=(reminders_exist, validate), to_state=display_error)validation_success = Event(from_states=validation, to_state=success)validation_failure = Event(from_states=validation, to_state=display_error).... |
Now, that we have an understanding of how the flow looks, we can go ahead with the finer implementations. For the sake of simplicity, a reminder can be modeled based on the below attributes:
def __init__(self, name, timestamp, content): self.id = id self.name = name self.timestamp = timestamp self.content = content |
Transitions are not very useful if nothing happens when they occur. The state_machine module provides us with the @before and @after decorators that can be used to execute actions before or after a transition occurs.
@before('reminder_exits')def welcome_message(self): print('Hi! Will help you to update reminder')@after('reminder_exists')def (self): switch(this.current_state): case 'display_error': # display error message to user break; case 'updated_data_exits': # ask the user to input data break; default: # default case break; |
Let’s define transition() function which accepts two arguments:
1. reminder
2. event
def transition(reminder, event): try: event() except InvalidStateTransition as err: print('Error: transition of {} from {} to {} failed'.format(reminder.name, reminder.current_state)) |
That’s it!
Wow! This is amazing. We eliminated a lot of conditional logic from the codebase. There’s no need to use long and error-prone if-else statements that check for every state transition and reacts upon them. The implementation is python specific but the pattern is code agnostic and can be abstracted to any relevant use case.
Hope this blog helps you understand how we can effectively use the state pattern.
Do let us know your valuable feedbacks & do come back for more such blogs. Also, we are hiring for various positions at Haptik, so if interested, do get in touch with us at hello@haptik.ai. More details here.
Special thanks to Swapan Rajdev & Ranvijay Jamwal for their support & help.











.webp?width=352&name=Charles-Proxy%20(1).webp)
