VectorDrawables not only reduce the size of your apk, but also add a very subtle wow factor to your app when used with AnimatedVectorDrawables. They provide us with the ability to animate their individual elements using ObjectAnimators through AnimatedVectorDrawables.
We will walk through an example showing how to implement some of the simplest yet effective animations to your VectorDrawables and make your app stand out in the crowd.
Let’s have a look at our clock vector’s start tag first:
vector xmlns:android="http://schemas.android.com/apk/res/android"android:height="48dp"<strong>android:viewportHeight40000003android:viewportWidth="12"</strong>android:width="48dp"> |
The drawing commands for different paths in a vector are defined with respect to the values assigned to attributes android:viewportHeight and android:viewportWidth. We can consider it as a cartesian plane having it’s corners at (0, 0) , (0, 12), (12, 0), (12, 12), with respect to which we can write our intended drawing commands. Say, I were to draw a line from the center of my drawable to the bottom most corner of the drawable. The drawing command would something like – draw a line from the point(6, 6) to the point(12, 12) .
Every vector drawable consists of multiple <path> elements. Every <path> element has a set of drawing commands assigned to it’s pathData attribute, which decides the shape of the path:
<!-- This draws the circle for the clock--><pathandroid:name="@string/circle"android:pathData="M 2,6 C 2,3.8 3.8,2 6,2 C 8.2,2 10,3.8 10,6C 10,8.2 8.2,10 6,10 C 3.8,10 2,8.2 2,6"android:strokeColor="@android:color/darker_gray"android:strokeWidth=".1" /> |
The <path> element above draws the outer ring of our clock vector. Have a look at the android:pathData attribute here. Let’s put some meaning to the string assigned to it. M 2,6 is to move the pointer to point(2, 6). C 2,3.8 3.8,2 6,2 then is to draw a curve from point(2, 6) to the point(6, 2) through point(2, 3.8) & point(3.8, 2) . And this goes on till the drawing commands are exhausted. Notice the values in our drawing commands are as per the viewPortWidth and viewPortHeight values assigned to the vector. When being rendered on the device, the drawable is drawn factoring in the device’s screen size & density and these values are scaled proportionally.
The attributes, android:fillColor & android:strokeColor, of the <path> element decide whether the path will be filled or stroked. If the path is filled, the inner area to of the shape drawn will be painted. If the path is stroked, the boundary of the shape will be painted.The android:fillColor attribute decides the color of the solid shape and android:strokeColor decides the color of the outline.
We uniquely assign a name to every <path> element, whose attributes are to be animated.
Now, Let’s have a look at the animated clock vector’s start tag:
<animated-vector xmlns:android="http://schemas.android.com/apk/res/android"<strong>android:drawable</strong>="@drawable/vd_clock"> |
The attribute android:drawable is where we assign the clock vector to our AnimateVectorDrawable.
It’s not too difficult to animate certain attributes of the path elements of a VectorDrawable. The code below animates the path-attributes strokeWidth and strokeAlpha:
<!-- animates stroke Width of the outer ring--><targetandroid:name="@string/circle"android:animation="@animator/change_width" /><!-- animates alpha of the outer ring--><targetandroid:<strong>name</strong>="@string/circle"android:<strong>animation</strong>="@animator/change_alpha" /> |
The name attribute of the <target> element in the AnimatedVectorDrawable corresponds to the name of the path/group( which will be discussed next), whose attribute is to be animated, and the animation attribute takes the animator, which is desired to run on that path/group. AnimatedVectorDrawable maps the ObjectAnimator to that name and then later runs these animators on the path/group with that name.
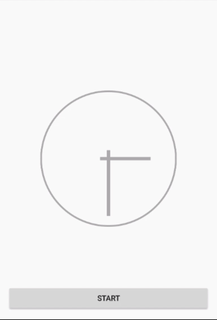
The resulting effect is:
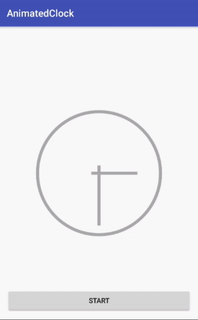
Well, Path-Attributes animations are only limited and hence don’t serve every use case. This is where <group> element in VectorDrawable comes to our rescue. Group-Attributes include properties like rotate, translateY/X and scaleY/X .Various paths can also be clubbed inside one group to achieve these animations, If desired.
Now, let’s have a look at the clock vector again:
<groupandroid:name="@string/minute_hand"android:pivotX="6"android:pivotY="6"><!-- minute-hand path--><pathandroid:pathData="M 5.5,6 L 8.5,6"android:strokeColor="@android:color/darker_gray"android:strokeWidth=".2" /></group> |
The minute-hand path of the clock is placed inside a group. The android:pivotX and android:pivotY attributes are assigned a value of 6. This ensures that the clock’s hand will rotate with its axis at the center of the viewPort. Each group again needs a unique name for the purposes of mapping animators to the specific group.
When we are done defining groups in the VectorDrawable, we can map our animators with these groups in our AnimatedVectorDrawable.
Now, let’s have a look at the animated clock vector again:
<!-- rotates the group named second_hand of the clock vector--><targetandroid:name="@string/second_hand"android:animation="@animator/rotate_second_hand" /><!-- rotates the group named minute_hand of the clock vector--><targetandroid:name="@string/minute_hand"android:animation="@animator/rotate_minute_hand" /> |
Finally, we have our AnimatedVectorDrawable ready. We can directly reference it in our ImageView through app:srcCompat and then later call start on it by getting a reference of it fromImageView:
ImageView animatedClockView;animatedClockView = (ImageView) findViewById(R.id.img_clock);((Animatable)animatedClockView.getDrawable()).start(); |
We can assign our AnimatedVectorDrawable to any ImageView programmatically as well:
AnimatedVectorDrawableCompat animatedClock;animatedClock = AnimatedVectorDrawableCompat.create(this, R.drawable.avd_clock_rotate);animatedClockView.setImageDrawable(animatedClock); |
The result is:
So, Check out my github repo where the complete source code is available for you to get started with. A post on Path-Trimming and Path-Morphing will be coming soon. #BuildBetterApps #AnimatedVectorDrawable #Android