
If you’ve been programming for iOS devices, you might have encountered these lines of code:
view.backgroundColor = [UIColor greenColor];view.layer.cornerRadius = 8.0;view.layer.borderWidth = 1.0;view.layer.borderColor = [UIColor blackColor]; |
If you haven’t seen code like this before try using it with any UI component in your app and check what it does. It adds a 1pt black border to the view and round its corners by 8pt.
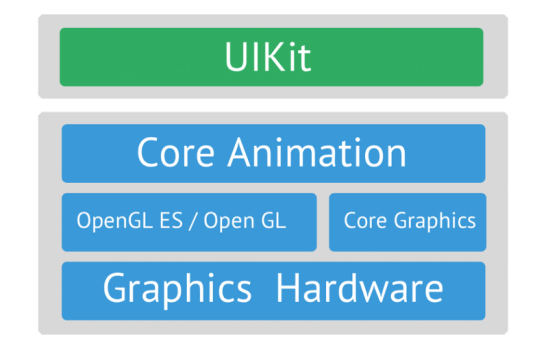
Every UIView is backed with a layer which can be accessed with the view.layer. The layer property points to an instance of either the CALayer class or any of its subclasses like CAShapeLayer, CAGradientLayer, CATextLayer etc. Layers are part of the Core Animation library and are extensively used in custom drawing with Core Graphics and Core Animation, these two frameworks make iOS apps beautiful. The image below shows where these two frameworks lie in the iOS graphics drawing engine:

OpenGL, a low-level API which interacts directly with the GPU, does all the heavy lifting work of graphics processing. To make our lives even easier Apple has built Core Animation, a high-level wrapper above OpenGL so that we don’t need to write the low-level C code.
Now, since we have been introduced to CALayer and have access to the low-level graphics rendering engine lets start interacting with them and create some beautiful graphics.
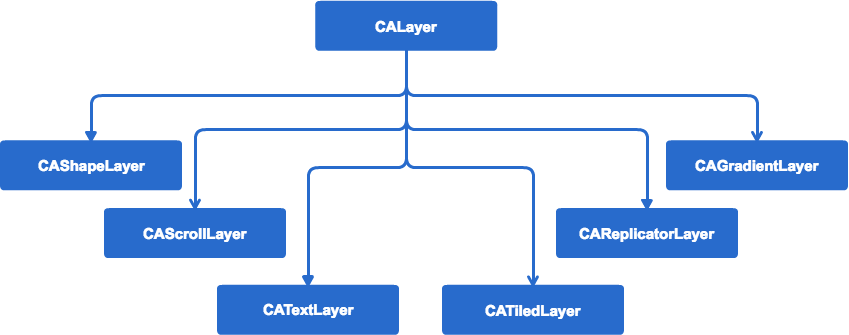
There are various CALayer subclasses, below are the direct CALayer subclasses available in the Core Animation library:
In this part of the series we will build:
- 1. A loading indicator with
CAShapeLayerandCAKeyFrameAnimation
CAReplicatorLayer- 3. A colorful Haptik logo with
CATextLayer -
CAShapeLayer -
With
CAShapeLayerwe can easily draw curved paths and geometrical shapes.CAShapeLayeris mostly used in drawing custom UI components. At Haptik, we design most of the customUIButtonsubclasses withCAShapeLayer. -
But why would you write code to draw a circle or a triangle or anything complex when you have images?

There are a few reasons to write code:
- Almost all properties of shape layers are
animatable, which gives us the freedom to change these shapes with code at runtime, which we’ll learn how to do. CAShapeLayeris vector based, thus they are resolution independent.- This can be drawn directly using the GPU so we can free the CPU for other tasks.
By the end of this section, we’ll be able to show this cool animation on the screen:
The animation above has three components:
- 1. A rounded rectangle added on the view layer
- 2. A gray color circle added on the rectangle layer
- 3. A dark gray color arc added on the circle layer
The below code draws the rounded rectangle on the screen:
CAShapeLayer *roundedRect = [CAShapeLayer layer];roundedRect.path = [UIBezierPath bezierPathWithRoundedRect:CGRectMake(0, 0, 120, 120) cornerRadius:8.0].CGPath;roundedRect.fillColor = [[UIColor whiteColor] colorWithAlphaComponent:0.5].CGColor;[self.view.layer addSublayer:roundedRect]; |
To create the path of the shape layer we used a UIKit class UIBezierPath to skip the complexity of drawing paths with Core Graphics. The fillColor property of the shape layer fills the closed region of the layer with given color.
Next, we add a circle to the rounded rectangle:
CAShapeLayer *circle = [CAShapeLayer layer]; circle.path = [UIBezierPath bezierPathWithArcCenter:CGPointMake(0, 0) radius:50 startAngle:0.0*(M_PI/180.0) endAngle:360.0*(M_PI/180.0) clockwise:YES].CGPath;circle.lineWidth = 5.0;circle.fillColor = [UIColor clearColor].CGColor;circle.strokeColor = [UIColor lightGrayColor].CGColor;circle.backgroundColor = [UIColor clearColor].CGColor;circle.position = CGPointMake(60, 60); [roundedRect addSublayer:circle]; |
For drawing a circle we need to pass a startAngle and an endAngle. With these angles, we tell the system from where the path should start and where it should be drawn till. If we were drawing this circle with a pen, consider the strokeColor as the ink color and the lineWidth as the minimum width of the line that can be drawn with the pen. Changing the position of the layer centers it in the rectangle.
To add the arc we will again use the same function for drawing a circle, but we will pass different start angles and end angles to draw it as an arc:
CAShapeLayer *arc = [CAShapeLayer layer];arc.path = [UIBezierPath bezierPathWithArcCenter:CGPointMake(0, 0) radius:50 startAngle:180.0*(M_PI/180.0) endAngle:225.0*(M_PI/180.0) clockwise:YES].CGPath;arc.lineWidth = 5.0;arc.lineCap = kCALineCapRound;arc.fillColor = [UIColor clearColor].CGColor;arc.strokeColor = [UIColor darkGrayColor].CGColor;arc.backgroundColor = [UIColor clearColor].CGColor; |
The lineCap determines how the endpoints of the drawn curve are stroked.
To create a rotational animation in x-y plane we need to change the rotation transform along the z-axis and fortunately, we can easily do this with Core Animation.
CAKeyframeAnimation *animation = [CAKeyframeAnimation animationWithKeyPath:@"transform.rotation.z"];animation.additive = YES;animation.duration = 10.0;animation.repeatCount = HUGE_VALF;animation.values = @[ [NSNumber numberWithFloat:0.0 * M_PI], [NSNumber numberWithFloat:1.75 * M_PI], [NSNumber numberWithFloat:-0.75 * M_PI], [NSNumber numberWithFloat:2.75 * M_PI], [NSNumber numberWithFloat:0.0 * M_PI] ];animation.keyTimes = @[ @0, @(2 / 6.0), @(3 / 6.0), @(5 / 6.0), @1 ];animation.timingFunctions = @[ [CAMediaTimingFunction functionWithName:kCAMediaTimingFunctionEaseIn], [CAMediaTimingFunction functionWithName:kCAMediaTimingFunctionEaseInEaseOut], [CAMediaTimingFunction functionWithName:kCAMediaTimingFunctionEaseInEaseOut], [CAMediaTimingFunction functionWithName:kCAMediaTimingFunctionEaseOut] ];[arc addAnimation:animation forKey:@"rotate"]; |
With CAKeyFrameAnimation we can control the animation attributes like fromValue and toValue, timingFunction, calculationMode for different time intervals in the complete animation. The values array determines fromValue and toValue of the animatable property ( transform.rotation.z) in the time intervals given to the keyTimes array. The timing functions decide how the animations start and end.
You can find the complete code till this section on this CALayers-GitHub repo.
CAReplicatorLayer
CAReplicatorLayer is a container layer, it replicates the content added to it. It has some cool properties which can be used to instruct the container how the replication has to be done. Beautiful effects can be achieved by applying animations to the replicated content. Every contained content is called an instance. To show the usage of this layer we will create a reflection of an image. By the end of this section, we’ll be able to show the reflection of the Haptik logo like this:
Let’s build this!
First, we need a CAReplicatorLayer instance and on this instance, we’ll be adding an image layer of which the reflection we will be showing:
// Create a CAReplicatorLayerCAReplicatorLayer *replicatorLayer = [CAReplicatorLayer layer]; // Create the image layerUIImage *image = [UIImage imageNamed:@"haptik_logo"];CALayer *imageLayer = [CALayer layer];imageLayer.contents = (__bridge id)[image CGImage];imageLayer.bounds = CGRectMake(0.0, 0.0, [image size].width, [image size].height);imageLayer.anchorPoint = CGPointMake(0, 0); // Set bounds of replicator layer // to height twice of image heightreplicatorLayer.bounds = CGRectMake(0.0, 0.0, [image size].width, [image size].height * 2);replicatorLayer.masksToBounds = YES;replicatorLayer.anchorPoint = CGPointMake(0.5, 0.0);replicatorLayer.position = CGPointMake(self.view.frame.size.width / 2.0, 80.0); [replicatorLayer addSublayer:imageLayer]; |
This code is pretty straight forward, the anchorPoint of a layer is the point from where all the geometric manipulations will happen. The default anchorPoint is (0.5, 0.5) which represents the center of the layer. We want to apply a rotation from the top of the layer, so we changed it to (0,0).
With the above code, we have added an image to the replicator layer and set its correct bounds. To get the reflection we need to apply a rotation transform and translate the replicated layer to the correct position as below:
CATransform3D transform = CATransform3DIdentity;transform = CATransform3DScale(transform, 1.0, -1.0, 1.0);transform = CATransform3DTranslate(transform, 0.0, -[image size].height * 2.0, 1.0);replicatorLayer.instanceTransform = transform;replicatorLayer.instanceCount = 2; |
The instanceTransform property of the replicator layer allows us to set the calculated transform on the replicated content. There are other properties of the replicator layer like instanceDelay, instanceColor which can be manipulated to get more control.
Setting the instanceCount to 2 instructs the replicator layer to create exactly two instances of the added content.
This is it! Running this code will give us the below output:
But this is not what you expected, yes because the mirror we used earlier was blurred and so was the reflection. But if that is what you also need then add a gradient layer to your layer as shown below:
CAGradientLayer *gradientLayer = [CAGradientLayer layer];gradientLayer.colors = @[ (__bridge id)[[[UIColor whiteColor] colorWithAlphaComponent:0.25] CGColor], (__bridge id)[[UIColor whiteColor] CGColor] ]; gradientLayer.bounds = CGRectMake(0.0, 0.0, replicatorLayer.frame.size.width, [image size].height + 1.0); gradientLayer.position = CGPointMake(replicatorLayer.position.x, replicatorLayer.position.y + [image size].height * 1.5); |
At Haptik, we have used the CAReplicatorLayer to create a new typing indicator. This is how it looks!
If you want to download and run this code check the Github repo. And yes, Craig Federighi was online. 😉
CATextLayer
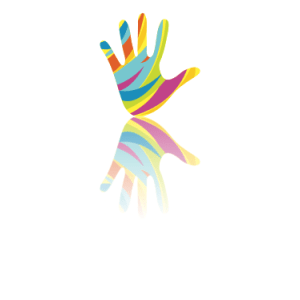
Text layers are used to layout and render plain and attributed strings, but we do this usually with UILabel. One amazing usage of CATextLayer is to mask UIView. In this section we will redesign the Haptik logo as in the image below:
![]()
We create a UIImageView with a pattern image and mask that pattern with the text layer:
// Create the imageViewUIImage *haptikLogo = [UIImage imageNamed:@"Artboard"];UIImageView *imageView = [[UIImageView alloc] initWithFrame:CGRectMake(0, 0, 300, 300)];imageView.image = haptikLogo; // Create the CATextLayer instance.CATextLayer *textLayer = [CATextLayer layer];textLayer.frame = imageView.bounds;textLayer.rasterizationScale = [UIScreen mainScreen].scale;textLayer.contentsScale = [UIScreen mainScreen].scale; |
Never forget to set the rasterizationScale and contentsScale, without these properties you might get blurry or smaller text depending on the screen resolution of the devices your app runs on.
Set whatever string you want to display as a mask with the desired font:
textLayer.fontSize = 100.0;textLayer.font = (__bridge CFTypeRef _Nullable)([UIFont systemFontOfSize:100]);textLayer.string = @"haptik"; |
Finally, use the text layer as the mask on the image view and we are done:
imageView.layer.mask = textLayer; |
Build and run the app and see how it looks like.
The app source code till this section can be downloaded from CALayer-Github repo. Looking forward to hearing from you all.
Also, don’t forget, we are hiring high-quality engineers. So if you are interested reach out to us at hello@haptik.ai.


.webp?width=352&name=Charles-Proxy%20(1).webp)


source on Google